


Foto aggiunte di recente
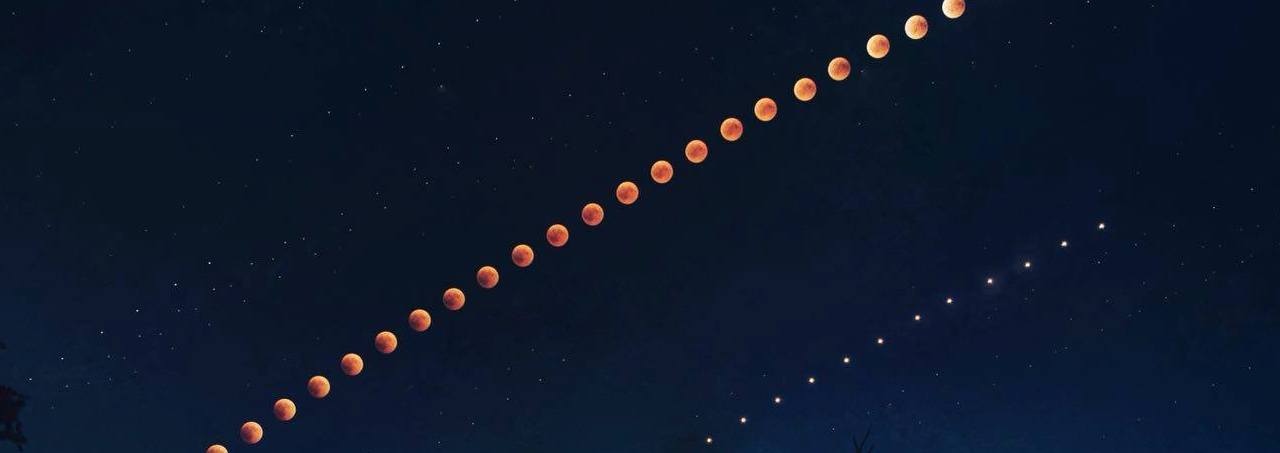
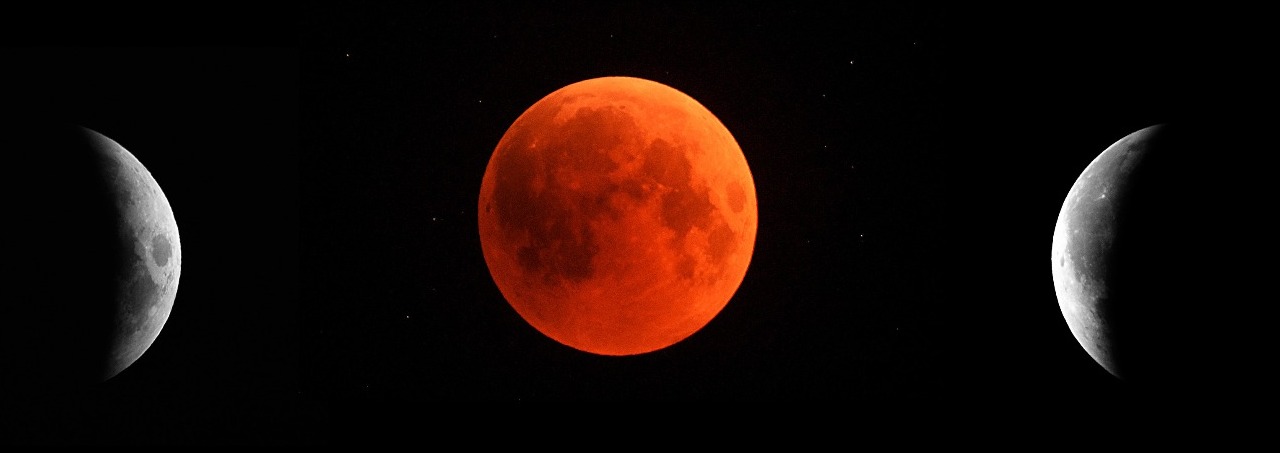
 Una serata indimenticabile per chi c'era, una Luna rossa meravigliosa. Noi eravamo presenti sia all'Osservatorio "Beppe Forti" sia alla Festa dell'Unicorno invitati dal comune di Vinci. In entrambi i posti l'afflusso di gente è stato più che copioso arrivando ad oltre 500 persone soltanto per quanto riguarda l'Osservatorio.
Ma lascio parlare i componenti del gruppo.
Una serata indimenticabile per chi c'era, una Luna rossa meravigliosa. Noi eravamo presenti sia all'Osservatorio "Beppe Forti" sia alla Festa dell'Unicorno invitati dal comune di Vinci. In entrambi i posti l'afflusso di gente è stato più che copioso arrivando ad oltre 500 persone soltanto per quanto riguarda l'Osservatorio.
Ma lascio parlare i componenti del gruppo.
Marco Iozzi
Più di 500 persone all'osservatorio ieri sera, curiose, che fanno domande a non finire di astronomia e non solo. Fioccano i perché, i ma come, i come è possibile, è bellissimo. Mentre Spiego la luna ed il perché del suo rossore mi chiedono, ma siete professionisti, no siamo appassionati.
Leggi tutto
Lo aveva promesso....e manterrà la promessa. Si...perchè il Dottor Piero Angela è un signore, un grande uomo.... Lo promise quel 29 Marzo 2003, quando non esitò a venire a Montelupo Fiorentino per la posa della prima pietra dell'osservatorio: "Tornerò per l'inaugurazione, lo prometto" disse.... Ed infatti ecco che sabato prossimo sarà ancora con noi, per vedere che, finalmente, quell'osservatorio che lui tenne a battesimo ora e' funzionante....
Leggi tutto Sarà il primo grande evento organizzato dal GRAM al “Beppe Forti” ed è inutile sottolineare quanto ne siamo orgogliosi...
Il 22-23-24 Giugno 2018, infatti ospiteremo il “MEETING CORPI MINORI dell’UNIONE ASTROFILI ITALIANI”,un evento di portata nazionale...con Astronomi ed Astrofili che ci illustreranno tutte le novità su nuovi metodi di ricerca,sulla conoscenza,sulle nuove scoperte è molto molto altro ancora.
Ringraziamo in anticipo tutti coloro che si sono prodigati a darci una mano per l’organizzazione, che speriamo sia all’altezza della manifestazione...
Un ringraziamento particolare al Comune di Montelupo Fiorentino che ci ha concesso il patrocinio..
La partecipazione è aperta a tutti, anche se, ovviamente, è più indicata agli addetti ai lavoriLeggi tutto
Sarà il primo grande evento organizzato dal GRAM al “Beppe Forti” ed è inutile sottolineare quanto ne siamo orgogliosi...
Il 22-23-24 Giugno 2018, infatti ospiteremo il “MEETING CORPI MINORI dell’UNIONE ASTROFILI ITALIANI”,un evento di portata nazionale...con Astronomi ed Astrofili che ci illustreranno tutte le novità su nuovi metodi di ricerca,sulla conoscenza,sulle nuove scoperte è molto molto altro ancora.
Ringraziamo in anticipo tutti coloro che si sono prodigati a darci una mano per l’organizzazione, che speriamo sia all’altezza della manifestazione...
Un ringraziamento particolare al Comune di Montelupo Fiorentino che ci ha concesso il patrocinio..
La partecipazione è aperta a tutti, anche se, ovviamente, è più indicata agli addetti ai lavoriLeggi tutto  Ogni Venerdì sera, per tutto il mese di giugno e luglio, dalle ore 21:00 in poi, vi aspettiamo numerosi presso l'Osservatorio "Beppe Forti" a San Vito (Montelupo Fiorentino) per osservare insieme le bellezze del cielo!!Leggi tutto
  Finalmente anche il nostro osservatorio ha la sua bellissima cupola! Ci sono voluti molti anni e tanto impegno, da parte di tutti, ma alla fine ci siamo riusciti. Un altro mattone che si aggiunge alla nostra struttura che ormai è quasi finito. Il prossimo passo sarà preparare l'interno della cupola per accogliere il telescopio!
Condividiamo,inoltre, con immenso piacere i ringraziamenti di Skypoint, ditta che ha realizzato la cupola e ha eseguito il montaggio:Leggi tutto
Finalmente anche il nostro osservatorio ha la sua bellissima cupola! Ci sono voluti molti anni e tanto impegno, da parte di tutti, ma alla fine ci siamo riusciti. Un altro mattone che si aggiunge alla nostra struttura che ormai è quasi finito. Il prossimo passo sarà preparare l'interno della cupola per accogliere il telescopio!
Condividiamo,inoltre, con immenso piacere i ringraziamenti di Skypoint, ditta che ha realizzato la cupola e ha eseguito il montaggio:Leggi tutto  Venerdì 7 Ottobre saremo ospiti del circolo di Pozzolatico (via impruneta 227, Firenze) per una serata osservativa con conferenza e apericena. La serata inizia alle 19.30 con l'apericena eLeggi tutto
Domenica 11 settembre, all'Osservatorio Astronomico "Beppe Forti", ci sarà la prima conferenza a carattere astronomico della sua storia...E sono felice che sia Daria Guidetti ad inaugurare ed aprire la strada ad altre iniziative del genere... Mi piace dire che Daria tornerà a casa...si..perché lei, come dice nelle sue note sotto, è un'astrofila di nascita ed il Gr.A.M è stato per lei
Leggi tutto
Ricordiamo che potete DONARCI il 5 x 1000 comunicandolo nella vostra dichiarazione dei redditi:
il ricavato sarà destinato al completamento dell'Osservatorio Astronomico di San Vito.
Leggi tutto "L'emozione era tanta, ancora stento a credere che sia successo" questo il primo commento a caldo del nostro presidente Maura Tombelli dopo l'incontro con Samantha Cristoforetti in cui ha potuto consegnarle l'attestato di nomina dell'asteroride a suo nome.
Leggi tutto
"L'emozione era tanta, ancora stento a credere che sia successo" questo il primo commento a caldo del nostro presidente Maura Tombelli dopo l'incontro con Samantha Cristoforetti in cui ha potuto consegnarle l'attestato di nomina dell'asteroride a suo nome.
Leggi tutto
Social Profiles